Sin categoría
The Difference a good shoeshine can make
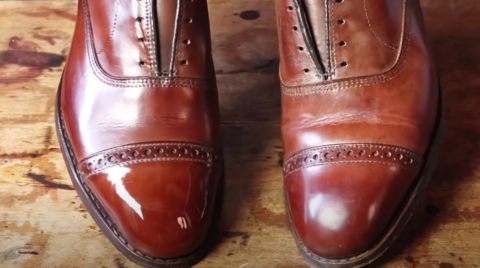
In today’s tutorial, I’m going to restore and shine one shoe in a pair and leave the other untouched so you can see the difference a little polish and wax can make. These Allen Edmonds Fifth Avenues in Chili need a little makeover so I think it’s time for them to get the treatment so their owner can all in love with them all over again.

The first step is to use a good shoe tree. You don’t want it to be too tight or too loose but a snug fit is what you’re looking for. This vintage shoe tree will work perfectly. Use A little common sense and feel it out. If the tree is really too tight don’t try to force it, A tree that is too loose is also not a good idea so find that Goldilocks zone where it’s just right.
Now before you can properly shine a shoe, you need remove all the old caked on polish, wax, and dirt from the leather upper. This pair is caked with grime and dirt so let’s get to work.
Saphir Reno’Mat is perfect for gently removing all of it off. It’s great to use because it leaves the factory finish untouched. I found that acetone can have unintended consequences if all you want to do is remove some old polish, you may end up inadvertently removing the factory finish as well. Acetone does have its place when dyeing shoes but it’s just not what I need here.
Once the shoes are ready to go, it’s important to condition the leather with Saphir Renovator. If your shoes are made of a more delicate leather like crust or kid skin, I recommend using the Nappa leather balm instead. It’s a gentler formula that works great for delicates.

Wait 5 minutes and brush for a nice shine. Afterward, you can use Saphir Cream Polish to restore some lost pigment. For this pair, Cognac or Mahogany are 2 colors I highly recommend. Depending on what color you want to accentuate you can use either. Cognac is great to accentuate amber and golden tones while mahogany is great for accentuating red and brown tones. Either is appropriate so you can make a decision based on that. Apply the cream with your fingers for maximum control. I found using a larger spatula dauber can waste cream. Brush after applying and waiting 5 minutes.
For the mirror shine, I’m going to use Pate De Luxe in Light Brown but you can also use mahogany or skip the pigment and go straight for neutral.
Apply 10 sequential layers with your fingers, one after the other. You’re going to want to cover the cap toe evenly and meticulously, so that it glazes over once you start buffing. Wait 5 minutes before you start polishing.
Using a cotton cloth around your two fingers and buff the dry wax with some ice water. Touch the wax every other time (just touch it-that’s more than enough to get the wax you need) and alternate between wax and TINY drops of water until you see the desired shine. Remember, and I can’t stress this enough, do not use too much water or you will oversaturate the leather and you’ll get a dull spot that won’t go away until it dries.
If you’d like extra help achieving a perfect mirror shine, don’t forget to check out my in-depth and comprehensive mirror shine tutorial here on YouTube here: https://www.youtube.com/embed/WXGxPbBGbC4
Now, once the mirror shine is done and this can take anywhere from 15 minutes to 40 minutes (I know it’s crazy), switch to a clean area on your cotton cloth and give the mirror shine it’s final buff, so that it looks clean and glass like.
As you can see, a little care goes along way. Putting in the extra effort can really improve your shoes appearance so don’t forget to #ShineYourShoes
Remember, if you’d like to see this article in video form, you can do it here:
The Difference a Good ol’ Fashioned Shoe Shine Shine Can Make: Shining Only One Shoe for Comparison

